Introduction to Playwright Testing
Author: Afsal Backer
Published: December 6, 2022
Table of Contents
When you pick a test automation tool for your project, what are the most important features you look for?
- Ease of developing and maintaining scripts
- Fast and reliable test execution with no flakiness
- Support web, mobile, API, and parallel testing
- An interactive test runner
- In-depth test failure analysis
- Cross-browser testing
- Support for keyword & data-driven testing
- Language support like Javascript, Typescript, Java, Python, etc
- DevOps integration with builds
- Intuitive test reporting
- Open-source, etc.
The first tool that most test automation engineers would think of is Selenium. However, an experienced engineer would know Selenium has its limitations. Enormous timeout, sync, and page load issues add up to the flakiness of the tests.
What about modern-day testing tools like Cypress or Puppeteer?
If you want to write isolated automated web component tests, Cypress.io is good as it offers many features to help you. However, the limitations outweigh the benefits for true end-to-end purposes. I wanted to like Cypress, and it does have a nice interface, but writing tests in Cypress has been a constant headache for me. The extensive use of plug-ins to cover its failures explains the current state of Cypress.
On the other hand, Puppeteer by Google is a node library that provides a high-level API that works only with Chrome or Chromium and does not support other browsers. Considering the fact that cross-browser testing must be conducted across platforms using multiple programming languages, Puppeteer would not be an ideal solution.
So is the case with other so-called no-code/AI-based test automation tools. Despite its strongly-worded marketing material, these tools don’t work as expected when pushed to the limits.
What if we combine all the good features of Cypress and Puppeteer, remove the flakiness associated with Selenium, add some no-code/AI features and create a brand-new tool?
Enter Playwright.
What is Playwright and how does it work?
Playwright is an open-source, NodeJS-based framework for web testing and automation. It allows testing Chromium, Firefox, and WebKit with a single API. Playwright is built to enable cross-browser web automation that is ever-green, capable, reliable, and fast.
Playwright, which has all the features of a good test automation tool listed at the beginning, was developed by the authors of Puppeteer and maintained by Microsoft. Playwright is compatible with Windows, Linux, and macOS and can be integrated with major CI/CD servers such as Jenkins, CircleCI, Azure Pipeline, TravisCI, GitHub Actions, etc. In addition, Playwright supports multiple programming languages such as TypeScript, JavaScript, Python, .NET, and Java, giving more options to QAs writing test scripts. It also supports native mobile emulation of Google Chrome for Android and mobile Safari.
Playwright has many great features, but my favorite by far is Auto-Wait. Playwright waits for elements to be actionable before performing actions. It also has a rich set of introspection events. The combination of the two eliminates the need for artificial timeouts — the primary cause of flaky tests. When the tester runs a Playwright test script, the UI is readied at the backend before the test interacts with web elements.
Now let’s get hands-on and look at some of these other amazing features. Of course, it will be difficult to explain all the features of Playwright in one article, so I will showcase some of my favorites.

1. Ease of Installation, Configuration, and Test Execution
Let’s start by installing Playwright.
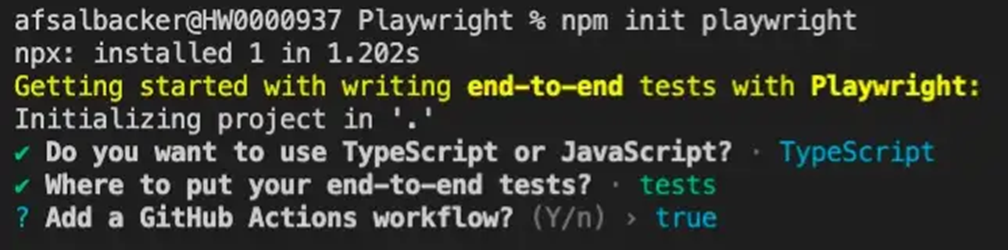
Selecting the required options installs Playwright in the chosen directory.
Once the installation is complete, a new Playwright project is created with the below structure.

And that’s it! You are ready to create/run tests. How easy was that?
‘Package.json’ contains the project dependencies, and ‘playwright.config.ts’ contains project settings like timeout, browser configuration for the project, etc.
The project comes with an example test, ‘example.spec.ts.’ Let’s execute this test to verify everything is working fine. To execute the test, run the command:
‘npx playwright test example.spec.ts’
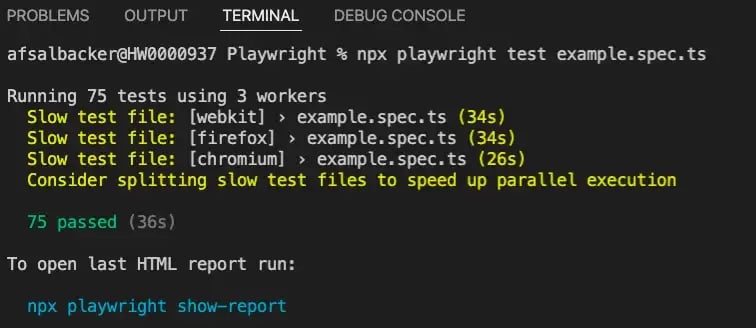
As you can see, 75 tests in ‘example.spec.ts’ were executed in less than 2 minutes using three browsers Safari, Firefox, and Chromium. That’s how fast Playwright is!
Playwright has a built-in reporting tool. Let’s look at the test report. To open the report, run the command:
‘npx playwright show -report’
This opens up an interactive report on a new browser page.

You can click on each test to see the execution steps in detail and their results.
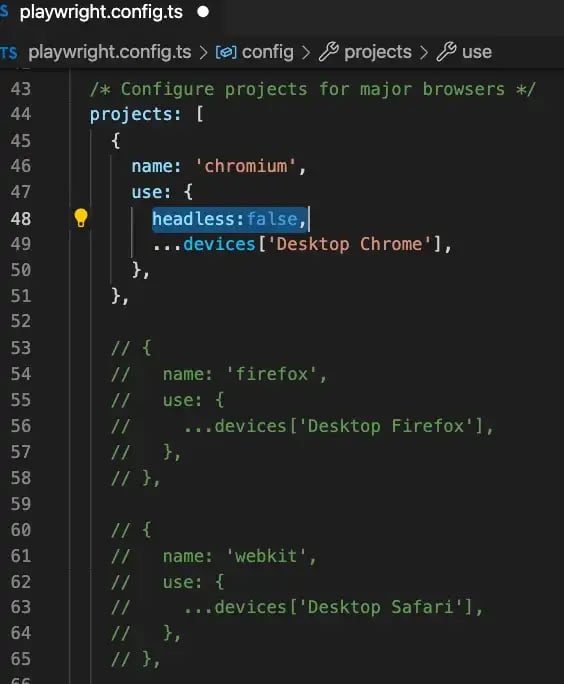
Playwright tests are, by default, executed in headless mode. To change this, add headless: false in ‘playwright.config.ts’ as shown below. I have also commented out Firefox and Safari browser configuration so that tests only run in Chrome browser now.
Let’s execute the test again.
25 tests were executed in ‘headless=false’ mode using 1 worker node (Chrome). It only took 27 seconds to complete the execution.
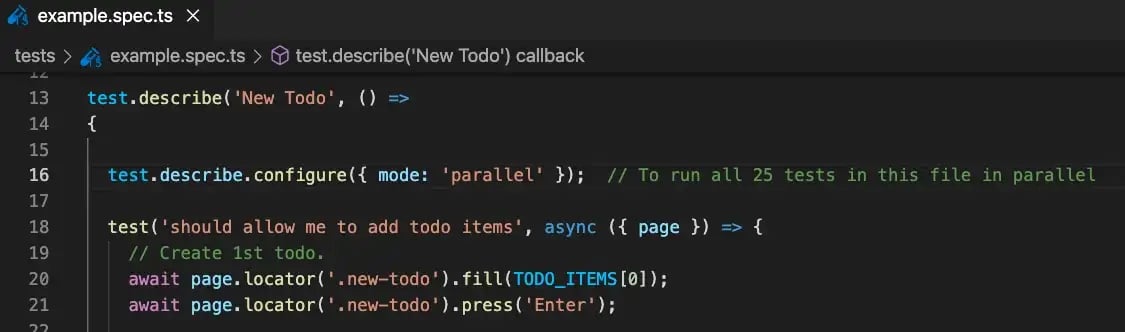
2. Parallel Testing in the Same File
Another important feature of Playwright is parallel testing. Unlike other tools that support parallel testing only when the tests are in different files, Playwright supports parallel testing of tests in one single file.
By default, test files are run in parallel. To disable parallelism, we must limit the number of workers to one.
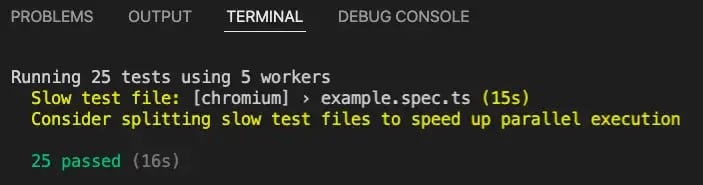
By default, tests in a single file are run in order in the same worker process. We can group tests with test.describe.parallel(title, callback). To run tests in a single file in parallel.
Upon execution, 5 workers are spun up, and tests are executed in parallel:

Test execution time was reduced to 16 seconds as opposed to the above sequential execution scenario, which took 27 seconds to complete.
3. Locators
Locators are the central piece of Playwright’s auto-waiting and retry-ability. In a nutshell, locators represent a way to find element(s) on the page at any moment.
To demonstrate Locators and other features of Playwright, I wrote a simple test that extracts the price of a product from an Amazon page.
You can get the project code from my Git repository at this link.
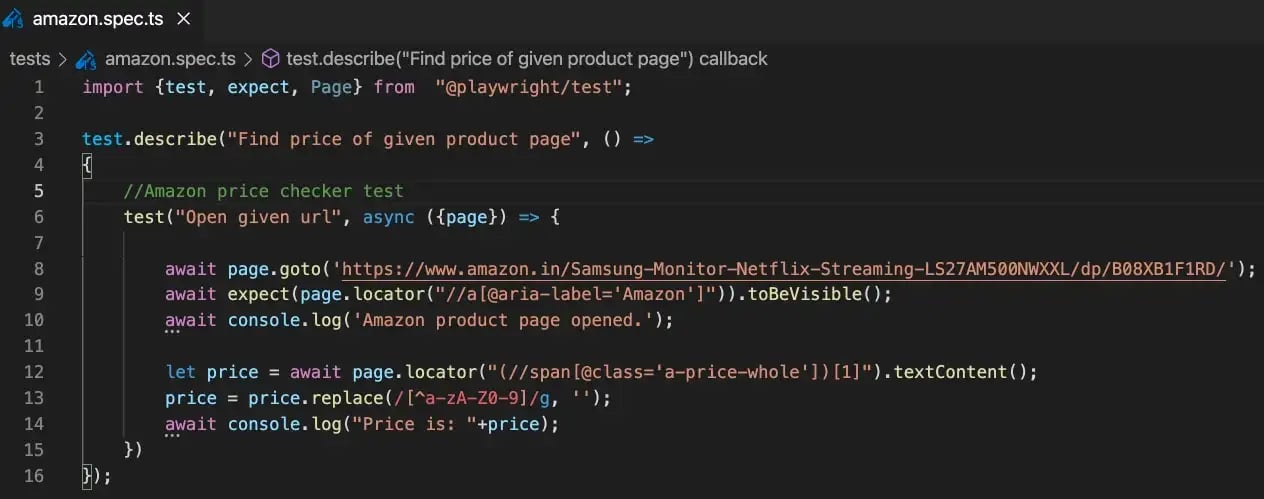
Upon execution, the test will run in Chrome, open up the product page in Amazon, extract the price and display it in the console.
Notice that I am using ‘locator’ instead of the conventional element handle ($) to find web elements. The difference between the Locator and ElementHandle is that the latter points to a particular element, while Locator captures the logic of how to retrieve that element.
4. Debug Using the Inspector Tool
Next, let me demo the Inspector tool by running the above test using a different command:
‘PWDEBUG=1 npx playwright test amazon.spec.ts’
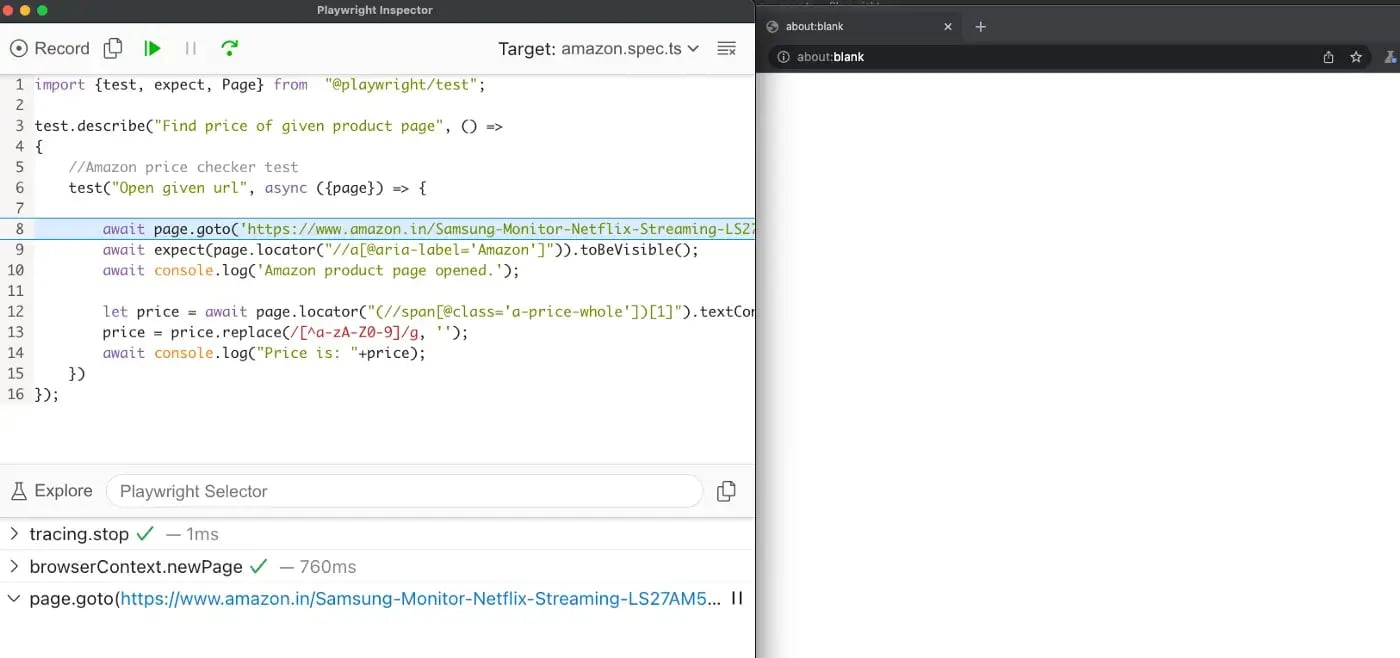
This opens up the inspector tool alongside the browser window and waits for me to click on the Resume button to perform the next step. With the Inspector tool, we can debug each line of code and see how the code works in real time on the browser.
Clicking on the ‘Explore’ button lets us hover over any web element on the web page, and clicking on any element on the page gives us the element locator, making it easier for us to find element paths.
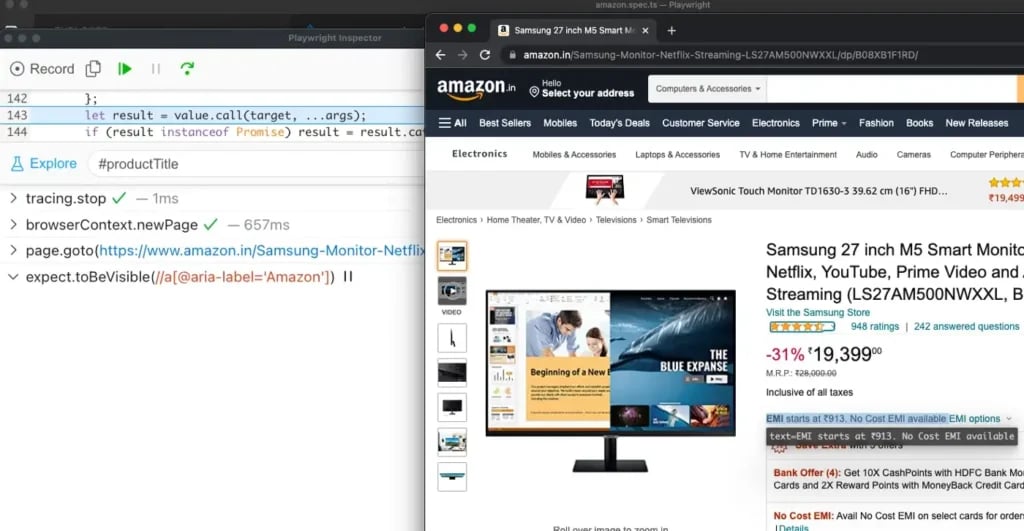
Highlighted element’s locator is displayed below it.
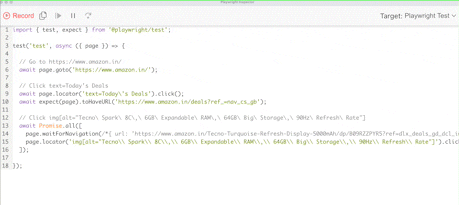
5. Test Generator
Playwright Code gen can generate tests out of the box. You can record UI interactions on-screen, and Playwright will generate the code for the user interactions. Codegen will attempt to generate resilient text-based selectors.
To open code gen, run the command:
‘npx playwright codegen amazon.in’
Start interacting with UI elements, and you will see Playwright generating code for it.

Isn’t that impressive? But that’s not the best part of Code gen. You can even convert the generated code to JavaScript, Java, Python, or C# automatically.
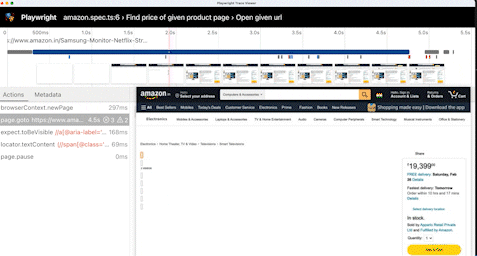
6. Test Trace Viewer
Playwright Trace Viewer is a GUI tool that helps explore recorded Playwright traces after the script runs.
To switch on the Trace viewer, Set the trace: ‘on’ option in the test configuration file. This will produce a trace.zip file for each test.
Selecting each action reveals:
- action snapshots,
- action log,
- source code location,
- network log for this action
7. Continuous Integration
Playwright tests can be executed in CI environments. While creating a project, Playwright can generate a GitHub Action Workflow .yml file for you. You can use this to start with GitHub Action CI set up and run tests in any cloud OS like Ubuntu, Windows, or Mac. You can also run Playwright in Docker.
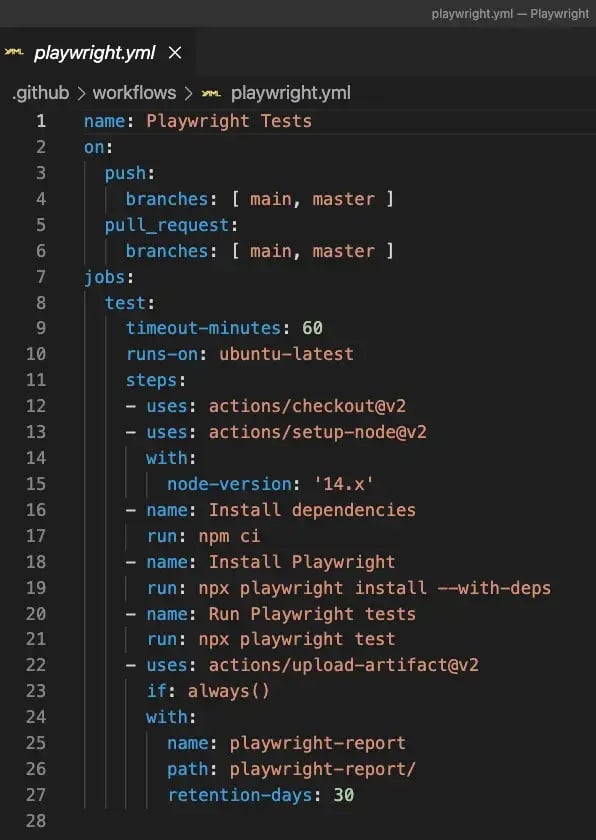
Like GitHub Actions, you can integrate Playwright with other CI servers like Jenkins, Azure pipelines, GitLab, CircleCI, etc.
Playwright can even connect to Selenium Grid Hub, which runs Selenium 4.

Conclusion
Playwright is an amazing framework to explore, and it’s getting better and better by adding new features in its monthly releases. Since its inception, it has evolved a lot and has a growing community of users. However, I should say this article covered only the tip of the Playwright iceberg. There are a lot of other cool features of Playwright that you should explore, and I hope this article will encourage you to do that.
Get started here https://playwright.dev/
Afsal Backer is a test automation engineer with experience in building UI and API test automation frameworks, implementing CI pipelines for QA, and test execution in AWS. He has certifications from Test Automation University. Afsal often shares on his LinkedIn and blog.
Related Posts:
Playwright vs. Cypress: Key Differences
Playwright and Cypress are two popular end-to-end testing frameworks used for web application testing. Playwright is a newer, open-source tool developed by Microsoft, while Cypress was developed as...
Playwright vs. Selenium: 13 Key Differences Between Both Frameworks
When trying to find the best web-based applications for software testing, how do you select the best one? Although perhaps you’re considering hiring an external team for QA services, you’d still need...

A Comprehensive Comparison of Regression Testing Tools
Tools for managing regression testing play a vital role in streamlining and organizing the testing process for software development teams. With a plethora of options available, it can be overwhelming...