When it comes to running tests, managing test data, and using those results to improve software quality, automation surely makes things simpler if you compare it to its counterpart, manual testing. The latter requires a real-life human carefully combing through application screens, trying out usage and input combinations, comparing results, and recording their observations. Not only is it time-consuming, it allows more room for error throughout the process.
What an automated testing tool provides is the ability to playback pre-recorded and predefined actions, compare results with expected behavior, and report the success or failure of manual tests to a test engineer. Once automated tests are created they can easily be executed, and repeatedly extended to perform tasks that are impossible to do with manual testing. Because of this, automated software testing is an essential component of successful development projects.
Meanwhile, Test automation frameworks are a set of rules and corresponding tools used for building test cases. Using a framework ensures increased code reusability, high portability, reduced cost of script maintenance, better code readability, etc.
Intro to Selenium Automation
Selenium is an open-source automated testing framework used to validate web applications across different browsers and platforms.
There are two components of Selenium that are most used:
- Selenium Webdriver is the most commonly used component of Selenium. It allows users to write custom code in their language of choice and interact with the browser of their choice, through browser-specific drivers.
- Selenium Grid allows users to run tests on different machines, with different browsers and OS simultaneously, providing the ability to run tests in parallel, which saves a lot of time and resources of testing on several machines.
Using Selenium WebDriver for Web Automation
This component has several points which make it a good option for web automation, including:
- Dynamic web page automation
- Works closely with the browser
- Mimics real users
- Supports cross-browser testing
- Supports parallel execution
- Supports CI/CD
- Test reporting
Using Selenium WebDriver for Web Automation
Generally, any Selenium test script would require the following steps, applying to all the test cases and applications under test (AUT).
- Create an instance of WebDriver specific to the Browser
import org.openqa.selenium.WebDriver;
import org.openqa.selenium.chrome.ChromeDriver;
WebDriver driver = new ChromeDriver(); - Navigate to the desired Web page which needs to be automated
driver.get(“https://https://zoom.us/”) - Locate an HTML element on the web page
In order to interact with a web page, we need to locate the HTML elements on the web page. We can use any of the element locator strategies.
Eg: if we want to get the “Full Name” text box, we can use the following commands:
import org.openqa.selenium.By; import org.openqa.selenium.WebElement;
WebElement fullNameElement = driver.findElement(By.name(“Full Name”)); - Perform an action on an HTML element
We can perform certain actions on the HTML elements, such as type something on a textbox, click on the element if it is a button, select an item from a drop-down, drag and drop, double click, hover, etc.
Eg: if we want to type the name in the text box we identified above, we can use the following commands:
fullNameElement.sendKeys(“Ravinder Singh”); - Run tests and record test results using a test framework
Once we are done using the WebDriver to identify and perform the needed actions on the Web Application, depending on the browser, which we need to test our application, we can use the corresponding WebDriver to execute tests.
Firefox: Gecko driver
Chrome: Chrome driver etc. - Obtain the test results to identify pass/fail
After test execution, test results are stored in the form of a report based on the framework or reporting system set up by the automation engineer. Screenshots of various pages/stages of the tests can also be added to the report.
Test Framework Architecture
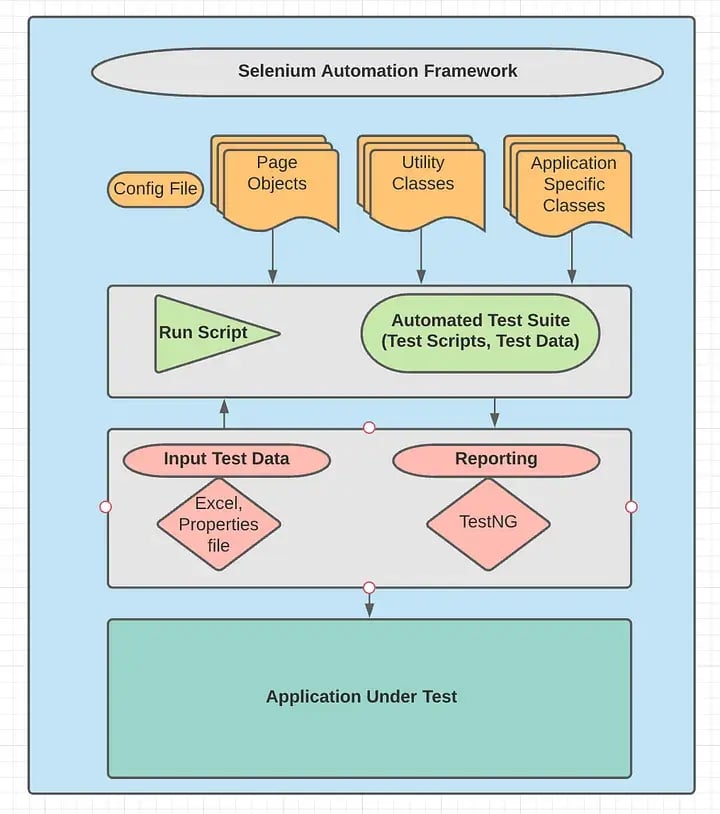
Below is the architecture diagram of the Selenium test automation framework. GitLab is the code repository and CI platform, the TestRail tool is used for test management and reporting, and tests are executed in the cloud using an AWS EC2 instance.
Platform Stack
- Java Programming Language — Selenium tests are developed in Java.
- Selenium — Test automation tool.
- TestNG — Testing framework.
- Maven — Build automation tool.
- REST Assured — Java library for Rest API testing.
Test Design Pattern
Page Object Model (POM) is a design pattern, popularly used in test automation that creates an Object Repository for web UI elements. The advantage of this model is that it reduces code duplication and improves test maintenance.
Under this model, for each web page in the application, there should be a corresponding Page Class. This Page Class will identify the WebElements of that web page while also containing Page methods that perform operations on those WebElements. This separates operations and flows in the UI from verification.
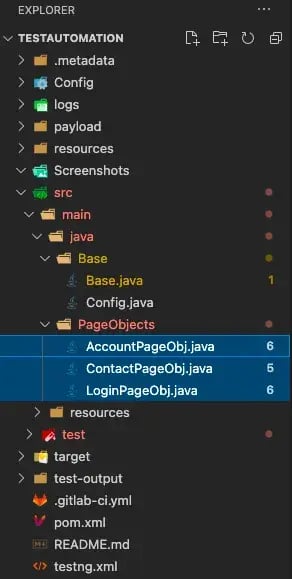
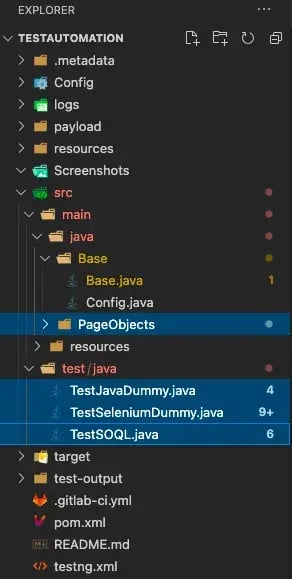
Page Factory class is used to implement POM. It’s also used to initialize Page class elements without using “FindElement/s.” This is done by using @FindBy annotation to locate WebElements. @FindBy can accept tagName, partialLinkText, name, linkText, id, css, className, xpath as attributes.

Other Important Components in the Framework
Classes
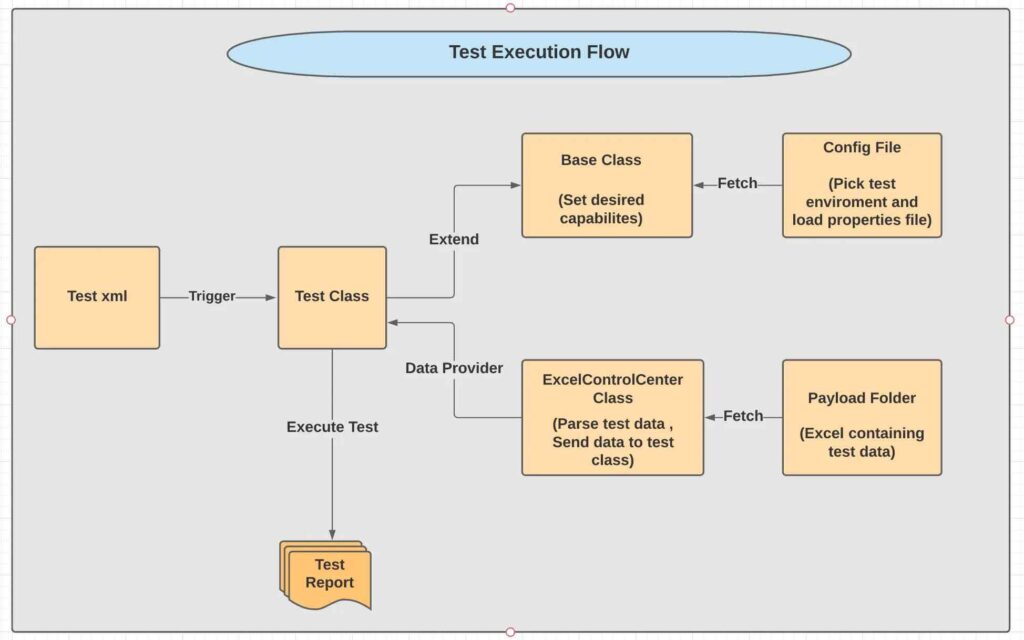
- Base Class
Desired capabilities, AUT URL, browser preference, browser mode (headed or headless — accepted as a parameter from the test XML file), debug log methods, test suite specific wait times, test failure screenshot taker, and test reports are initialized in Base class. Every test class extends the Base class. The Base class can also accept parameters from testng.xml file (example: headless: yes/no). - CustomListener
CustomListener class implements ITestListener of TestNG. Methods in CustomListener are executed during events like test start, stop success, failure, etc. This class can be used to perform certain actions like calculating test execution time, capturing test failure screenshots, etc during certain test events.
All test classes should add listener @Listeners(CustomListener.class)
- Config Class
Config class reads properties file from Config folder. Each test environment has its own properties file. The user defines which test environment to pick for test execution in the Config class before executing the tests. - ApiEndpoints Class
This class defines API endpoints, tokens, and credentials for all API tests. - ApiHelpers Class
This class defines API helper methods to be used in all API tests. - ExcelControlCenter Class
ExcelControlCenter class reads test data from the Excel sheet placed in the Payload folder of the project. Test classes use TestNG Data Provider to fetch data from Excel. Excel file name and sheet name are passed to the Data Provider. ExcelControlCenter class then parses this data and sends it back to the test class. - Page Class
Page class contains all generic or reusable methods specific to Selenium and the application under test.
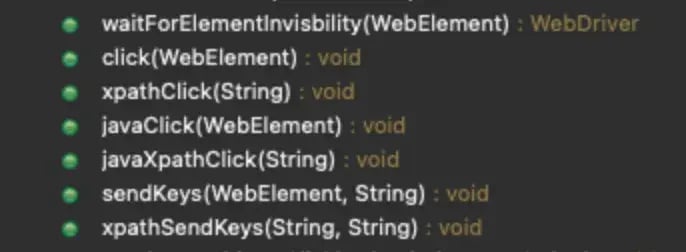
Modified and optimized Selenium-specific actions like sendKeys, click, etc. are in the Page class.
For example,
Selenium action to click an element –
driver.findElement(By.xpath(xpath)).click();
is modified to –
public void xpathClick(String xpath) throws InterruptedException
{
waitForClickableDynamicElement(By.xpath(xpath));
driver.findElement(By.xpath(xpath)).click();
LOGGER.info(“Button clicked.”);
}
This method waits for the element to be clickable, clicks the element, and prints a message, thereby extending ease of use and reusability in test methods. It can be invoked from test methods as –
xpathClick(“@id=’Leads”);
xpathClick(“@name=’Test Lead”);
Please go through Page class to identify more such wrapper methods and use them in test classes.
Packages
- Base
Contains Base and Config classes mentioned above. - Constants
Contains classes that define constants to be used in other classes or tests.
Example: ApiEndpoints.java - Helpers
Contains classes that define helper methods to be used in tests to avoid code redundancy.
Example: ApiHelpers.java - PageObjects
Contains all page object classes.
Example: AccountPgObj.java - DataLoader
Contains classes that can be used to create bulk test data using UI/API automation.
Example: CreateAccountContactOpportunityQuote.java - Utilities
Contains all utility methods that can be called by tests.
Example: ExcelControlCenter.java and CustomListener classes.
Files and Folders
- Testng.xml
All tests are executed from testng.xml or similar custom-made XML files that list the test class and/or test methods required to be executed.
testng.xml file accepts parameters that can be passed to the Base class.
Example: <parameter name=”headless” value=”no” /> - Pom.xml
All project dependencies are listed in pom.xml and downloaded by Maven. - Config folder
Contains environment-specific properties files that store credentials or test input data that can be passed as parameters to tests. - Logs folder
Stores the console log output of the recent test in a file. - Payload folder
Contains excel or JSON files that contain test data which can be passed to data providers or API test classes. - Screenshots folder
All test failure screenshots are captured and stored in this folder.
Test Execution Flow
Getting Started
To start building automation tests, we need the below-mentioned tools installed in the local machine.
- Java
Download the installer program and install it. - Eclipse/Visual Studio Code
Based on your preference, download and install Eclipse or Visual Studio Code. - Maven
Follow the steps mentioned in this article (MacOS) or this article (Windows) to set up Maven. - Git
Follow steps 1–7 mentioned in Git Configuration for Test Automation to download, install and set up your GitLab account and configure it in your local machine.
Importing a Project
Once we have all the required tools installed in the local machine, we need to import the project from GitHub/GitLab to the local machine.
- Cloning the project to VS Code
Follow the steps mentioned here to clone a project. - Cloning the project to Eclipse
Follow the Cloning Repositories steps mentioned at EGit Tutorial — EclipseSource to clone a project. - Project Repository
Running a Test
After cloning the project to the local machine, wait for all project dependencies to be downloaded. Project dependencies are specified in the POM.xml file. All dependencies are downloaded automatically.
The next step is to edit the testng.xml file from the root of the project. Add/Modify <class name=”DataLoader.TestSeleniumDummy”/>
To run a test in headless browser mode, change <parameter name=”headless” value=”no” /> value from no to yes.
To run the test in Eclipse:
Open testng.xml > right click > Run as > TestNG Suite
To run the test in VS Code:
Open Terminal and execute mvn test -DsuiteFile=”testng.xml”
Verify that the test is executed successfully.
In Summary
So now we’ve learned how to set up a simple Selenium test automation framework, as well as some best practices. These tips and tricks are sure ways to get more done in less time, while also reducing the possibility for error.


