
Testing your web apps across different browsers and devices is crucial. BrowserStack offers two powerful tools: BrowserStack Automate and BrowserStack Live. They both help with testing, but they do different things.
This article clarifies the differences between BrowserStack Automate and BrowserStack Live, helping you choose the best fit for your testing needs. Whether you're a seasoned pro or just starting out, we'll guide you through their features and benefits for seamless cross-browser testing with BrowserStack.

BrowserStack Automate vs BrowserStack Live: Key Takeaways
In summary, BrowserStack Automate and BrowserStack Live are two distinct offerings from BrowserStack, each catering to specific testing needs.
- BrowserStack Automate is ideal for teams that require automated testing, CI/CD integration, and parallel test execution. It’s a powerful solution for regression testing, test automation, and maintaining application quality at scale.
- BrowserStack Live is ideal for manual testing, debugging, and resolving real-time issues. It is an excellent choice for situations where testers need to interact with the application directly and collaboratively.
Ultimately, the choice between the two depends on your project’s requirements. Many organizations use both BrowserStack Automate and BrowserStack Live in tandem to cover all aspects of their web application testing needs, ensuring a seamless user experience across various platforms.
What is BrowserStack Automate?
How BrowserStack Automate Works
BrowserStack Automate is a robust tool designed to simplify and enhance the efficiency of automated testing, allowing developers and QA teams to scale their tests and deliver features faster.
This eliminates the need for maintaining a complex in-house testing infrastructure, saving time and resources. It ensures your product works correctly for a wide audience by offering access to real devices and browsers, not just simulations. BrowserStack provides comprehensive test coverage with over 3,000 browsers and 20,000 real iOS and Android devices.
Given that 73% of testers use automated testing or scripting for functional and regression testing (AIMultiple Research), it’s clear that automation is no longer optional. Developers and QA teams are seeking solutions that enable them to integrate automated testing seamlessly into their workflows.
Benefits of BrowserStack Automate for QA Teams
-
Parallel Testing: Run thousands of tests simultaneously to reduce execution time significantly.
-
Cross-Browser Testing: Test across 100+ browser and OS combinations to ensure compatibility.
-
CI/CD Integration: Easily integrate into your CI/CD pipeline for faster feedback.
-
Real User Conditions: Simulate network conditions, GPS, and more to test in real-world environments.
-
Automated Screenshot Comparison: Easily spot visual regressions across browsers.
For teams seeking to integrate robust automated testing into their development pipeline, a service like MuukTest can offer expert QA and seamless integration with CI/CD, thereby enhancing testing efficiency and coverage. MuukTest is known for achieving complete test coverage within 90 days.
Use Cases for BrowserStack Automate
BrowserStack Automate caters to a wide range of testing needs, including:
- Regression Testing: Ensure that new code changes haven’t introduced bugs into existing functionalities.
- Cross-Browser Testing: Verify that your web application renders and functions correctly across different browsers and versions.
- Mobile App Testing: Test your mobile apps on a wide array of real devices, ensuring compatibility and performance.
- Visual Testing: Detect and fix visual inconsistencies across different browsers and devices.
These capabilities make BrowserStack Automate a valuable tool for any development team striving to deliver high-quality web and mobile applications.
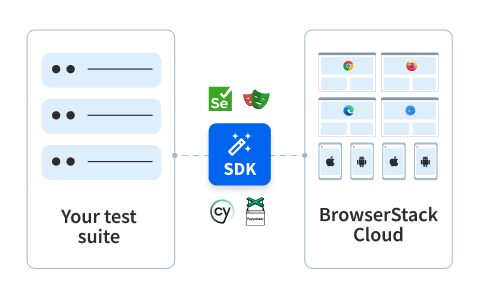
You can write your automated test cases and trigger them from your machine. These tests execute on your highly reliable cloud infrastructure. You can then view and debug results on the BrowserStack Automate dashboard.
Thousands of tests can be run in parallel, reducing test execution time from hours to minutes. BrowserStack Automate manages your test infrastructure, allowing you to focus on scaling tests and shipping features faster.
It has over a hundred browser and OS combinations, which you can pick from the list mentioned here.
Getting Started with BrowserStack Automate
Test execution on desktop browsers:
Let’s walk through the steps to set up and run tests using BrowserStack Automate.
In this example, we will be using Playwright with Node.js, as Playwright is one of the leading testing automation tools on the market right now. We will run the tests using NodeJS SDK on BrowserStack’s Playwright Grid, which supports over 100 browser-OS combinations.
1. Create Your Account:
Begin by creating a BrowserStack account and obtaining your username and access key from BrowserStack’s profile page.
2. Install Node.js:
Ensure that you have Node.js version 14 or higher installed on your machine. You can download it from the official Node.js website.
3. Clone the Test Project:
Clone the test project from here, which contains example test files for demonstration (originally forked from BrowserStack's official repo).
This is a simple project with 3 test files:
a. test_pl_table_topper.js : opens this link and finds the team that is on top of the table.
b. test_mobile_fpl_deadline.js : same as above, but for mobile device testing.
c. test_fpl_deadline.js that opens the webpage, checks the deadline date, and alerts the user if today is deadline day.
4. Install Dependencies:
Navigate to the project directory in your terminal and run the command npm i to install the required dependencies.
5. Configure browserstack.yml:
Edit the browserstack.yml file, replacing [Add your username here] and [Add your access key here] with the credentials obtained in step 1.
Configure the test environments to specify the browsers and operating systems you want to target. Then configure the test environments to specify the browsers and operating systems you want to target.
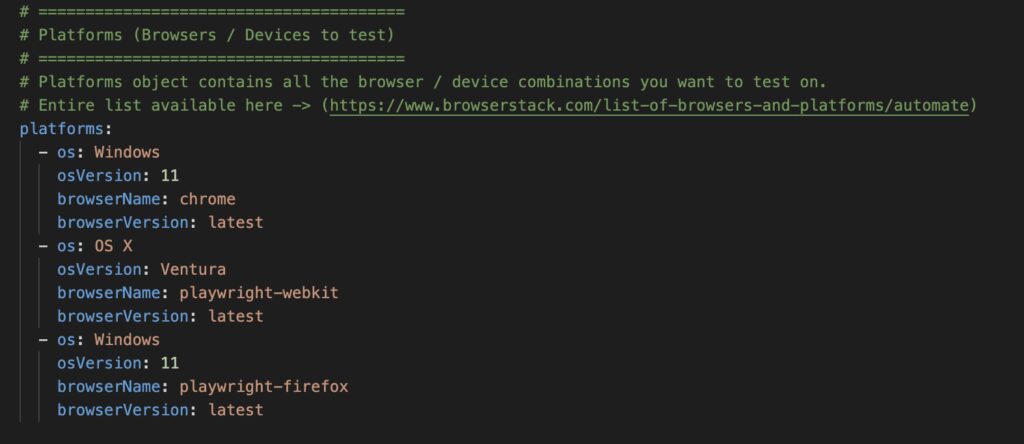
In this case, we have set up the tests to run on two operating systems (Windows 11 and OS X) and three browsers (Chrome, Safari, and Firefox).
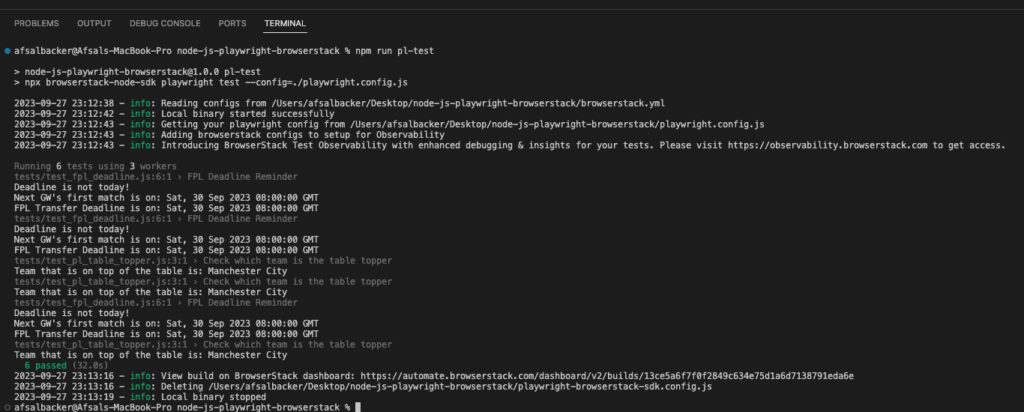
6. Run Tests:
Execute the tests using the command npm run pl-test. The tests will run on BrowserStack’s infrastructure, with logs showing the progress and a link to view the test report on the BrowserStack platform.
On your console logs, you can see both the tests running on three different browsers in parallel using three workers on the BrowserStack infrastructure.
7. View Test Results:
The test report displayed on the dashboard provides details on the number of tests executed, passed, and failed, along with information about the test framework, browsers, and operating systems used. You can also access additional information such as test video recordings, network logs, console logs, and device details.
At the end of the logs, it provides the URL to view the test report on the BrowserStack platform. Open this URL in a browser to see the full test report.
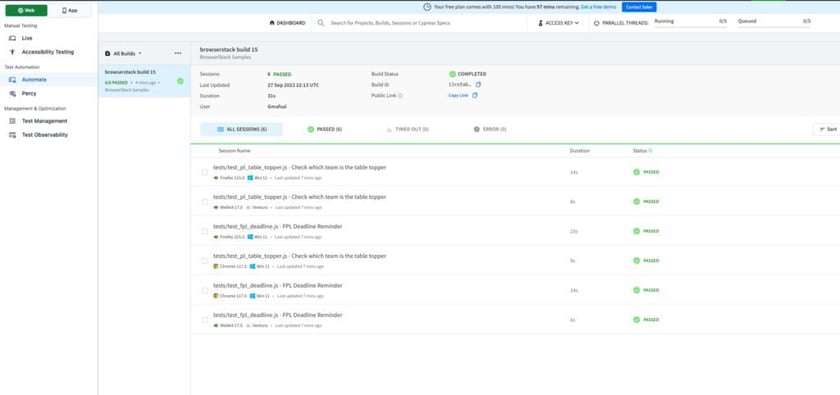
The test report is now displayed on the dashboard with the number of tests executed, passed and failed details, test framework used, browser, OS used for each test, etc.
You can clearly see that my tests were run across Firefox, Safari, and Chrome on both Windows and Mac operating systems. That is how easy it is to scale your tests on BrowserStack Automate. All the hassle of setting up a test infrastructure is taken away from you, and you get to spend time on building the tests rather than worrying about the infrastructure.
Clicking on any test displays the full details of the test run, including the test video recording, network logs, console logs, device information, and more.
Another really good feature is that you can share your test results using a public link, with which anyone can view the interactive test results while keeping your private information hidden.
Here is the link to my test execution if you would like to check it out.
Test execution on mobile browsers
Now let’s execute one of the above tests (b) test_mobile_fpl_deadline.js on an Android mobile device on the browser stack platform.
At the time of writing this article, BrowserStack only supports Android testing for Playwright.
1. Configure the Device and Browser combination
You can set the Android Browser-OS combination in the playwright.config.js as shown below:

I have set the device name to “Samsung Galaxy S22” for this test, as I wish to test it on a Galaxy S23 device. Similarly, we can test for other devices by setting this value to “Samsung Galaxy S22 Ultra”, “Google Pixel 7 Pro”, “OnePlus 9”, etc.
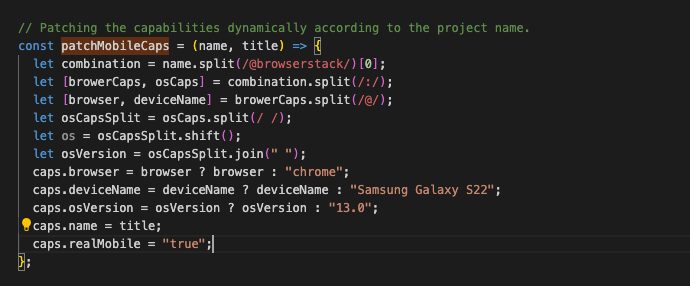
2. Configure fixture.js
In the fixture.js file, add your username and access key under [Add your username here] and [Add your access key here] fields.
The patchMobileCaps function in the fixture.js file facilitates the dynamic patching of capabilities according to the project name.
3. Run Tests:
Now you can run the test using the command npm run mobile-test
BrowserStack will spin up a Samsung Galaxy S22 device on your account and run the test. Just as with the previous test, you can view the test results and other details on the dashboard.
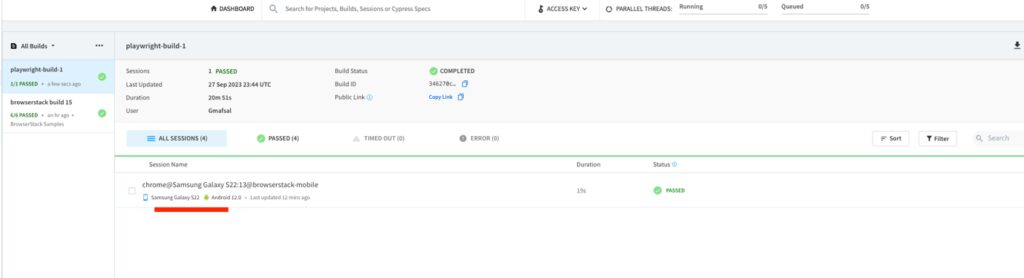
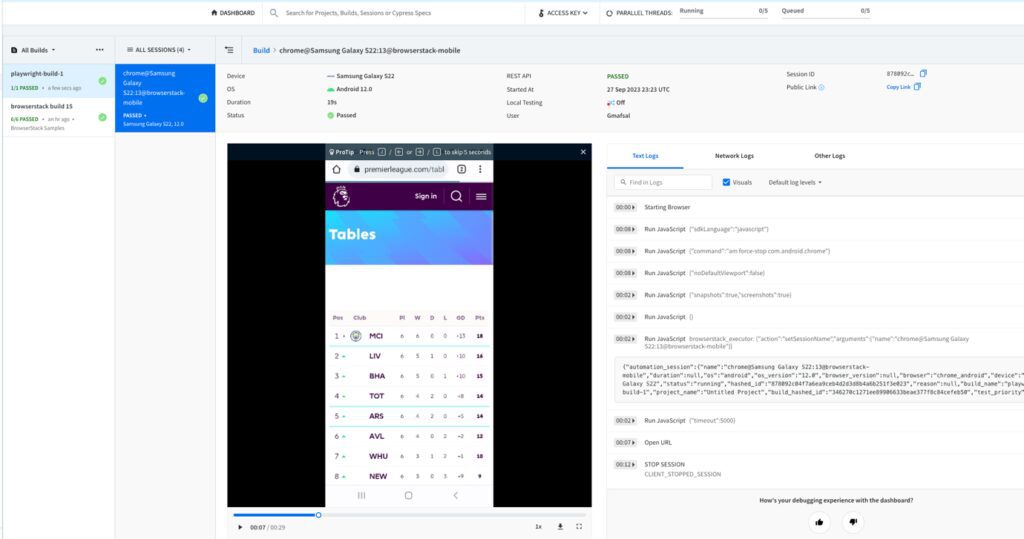
Here is the link to my test execution if you would like to check it out.
Conclusion
BrowserStack Automate offers a comprehensive solution for automated web application testing. Beyond the features covered in this article, it offers advanced capabilities, including testing Chrome Extensions, file uploads, and integration with tools such as Lighthouse. Moreover, Automate seamlessly integrates with popular CI/CD platforms like GitHub Actions and Jenkins, enabling you to automate and streamline your testing process. By harnessing the power of BrowserStack Automate, you can enhance the quality of your web applications and accelerate their delivery to users.
What is BrowserStack Live?
How BrowserStack Live Works
BrowserStack Live is designed to provide developers and QA professionals with the ability to conduct real-time, manual testing on a wide range of browsers and devices. This tool empowers you to interact with your web applications remotely, mimicking user behaviors and scenarios, and ensures that your software meets the highest standards of quality and user experience.
Key Features of BrowserStack Live?
- Live Interactive Testing: BrowserStack Live allows you to access real browsers and devices remotely. With this feature, you can manually explore and interact with your web application as if you were using it on your local machine.
- Instant Bug Reproduction: Debugging and issue resolution become more efficient with BrowserStack Live. You can easily reproduce reported issues on different browsers and devices, allowing for swift identification and resolution of bugs.
- Responsive Testing: Test the responsiveness of your web application effortlessly. Resize browser windows, switch between devices, use different browser versions, and emulate various screen resolutions to ensure your application adapts seamlessly to different screen sizes.
- Developer Collaboration: BrowserStack Live simplifies collaboration between developers and QA professionals. You can share live test sessions, making it easier to communicate, troubleshoot, and address issues in real-time.
- Geolocation Testing: Verify location-based features by simulating GPS coordinates. Ensure that your application behaves correctly in different regions, providing consistent functionality for users worldwide.
Getting Started with BrowserStack Live
Let’s walk through the steps to start using BrowserStack Live for your testing needs.
1. Create Your Account:
You can begin by creating a BrowserStack account to gain access to the BrowserStack Live tool.
Access the tool. Enter the URL of the web app you would like to test and click on Start Test button. We will use the same Premier League app URL we did for BrowserStack Automate.
2. Select Your Testing Environment:
You can choose from a wide array of real browsers and devices, including different versions and operating systems, to create your ideal testing environment.
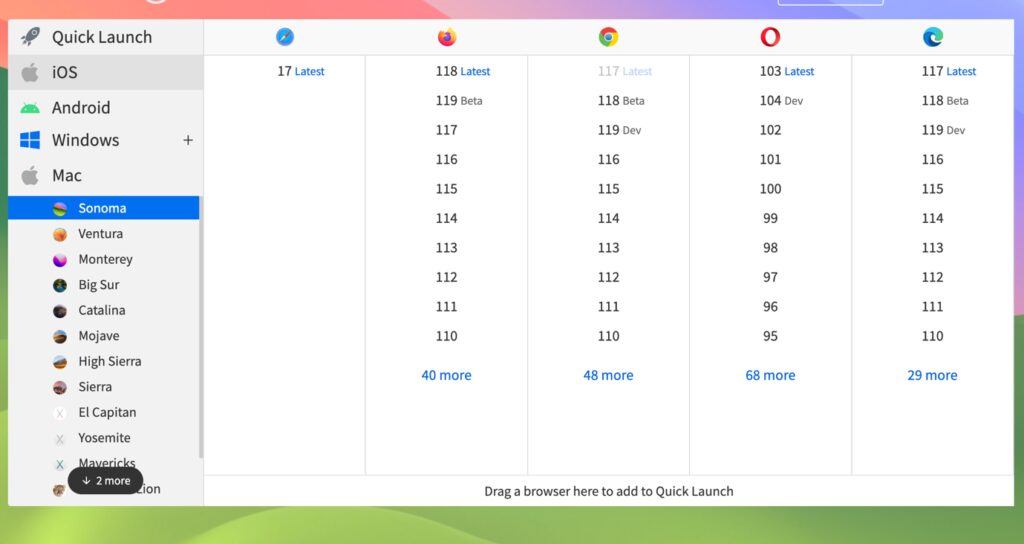
You can run your tests across new and old versions of Edge, Safari, Chrome, IE and Firefox on Windows and macOS.
This helps in the seamless reproduction of bugs your users might have reported on specific devices with specific browser versions.
Windows options:
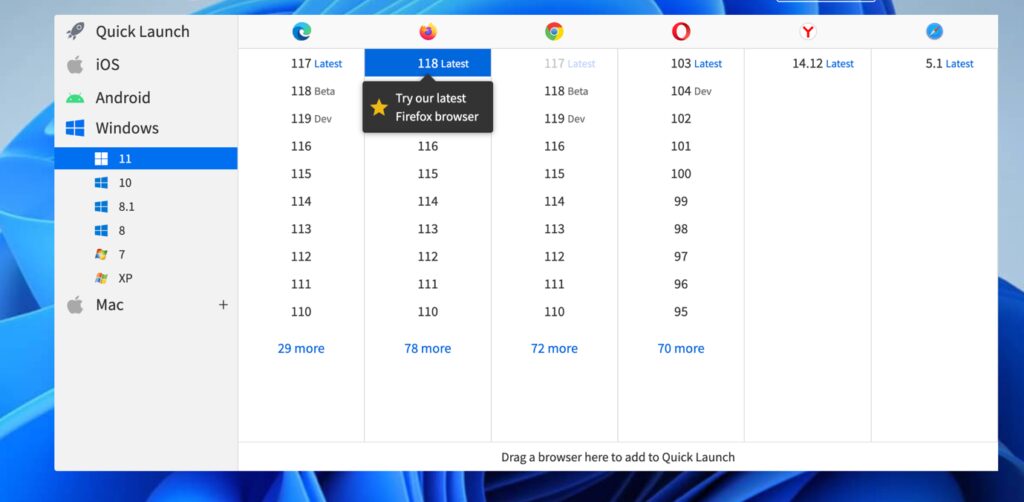
Mac options:
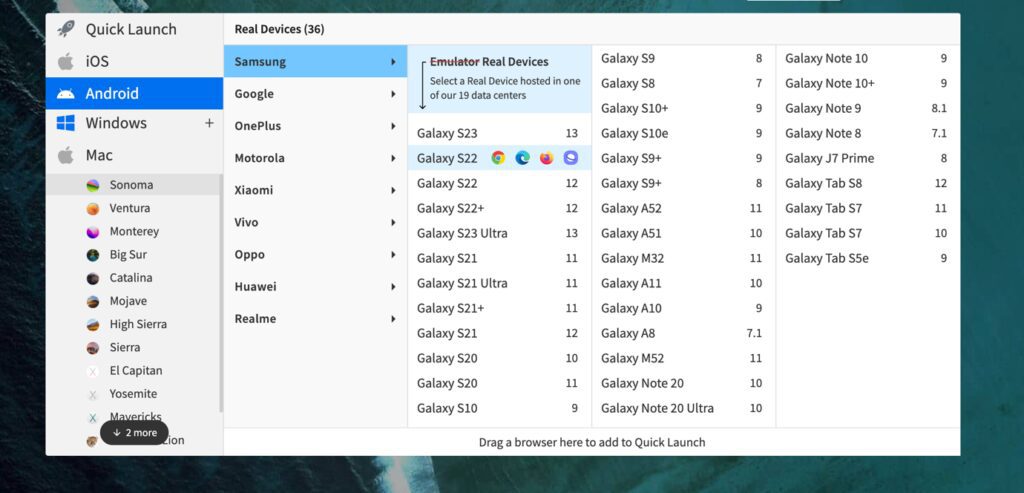
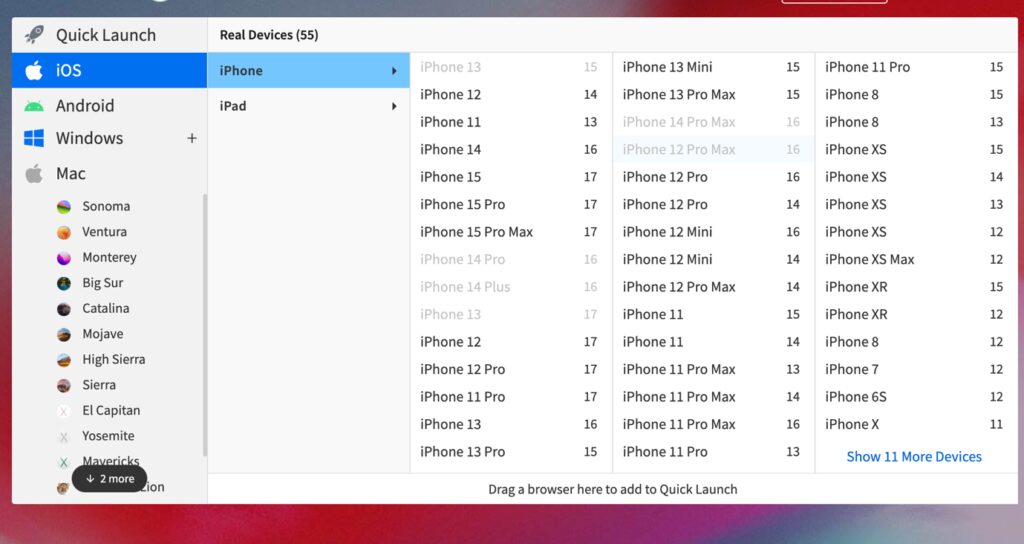
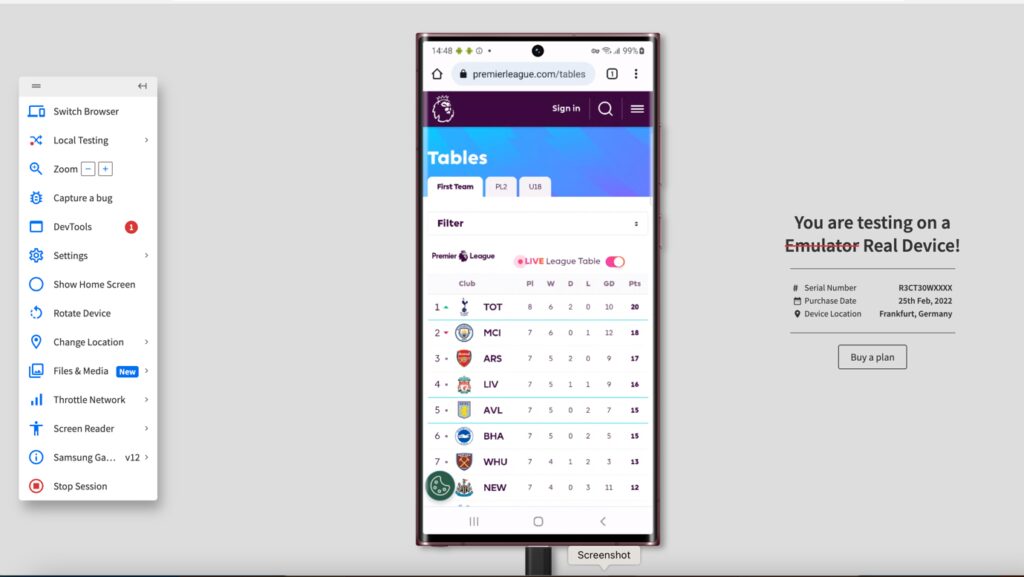
You can also run your tests across a range of real Android and iOS devices.
Android options:
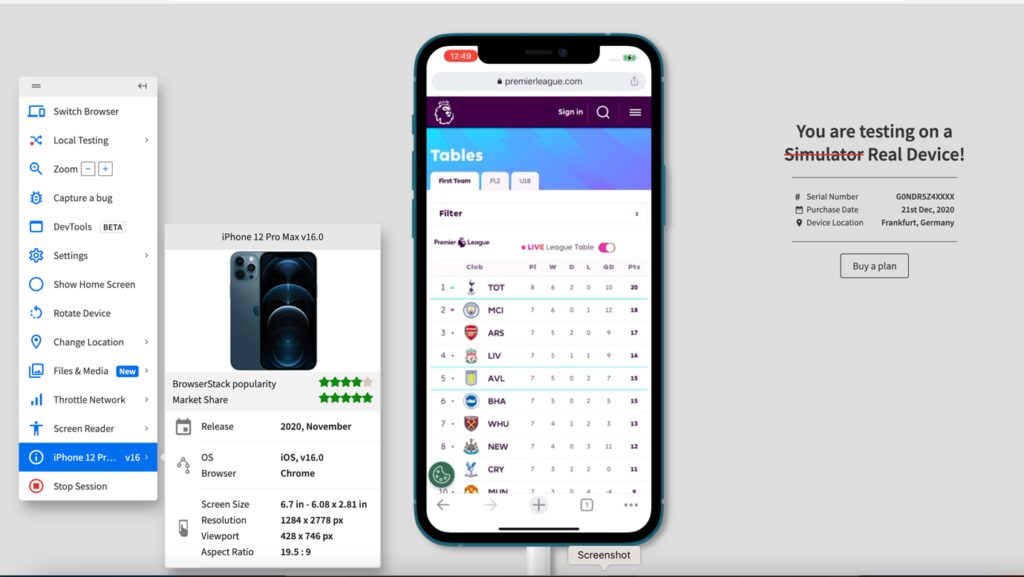
iOS options:
3. Begin Manual Testing:
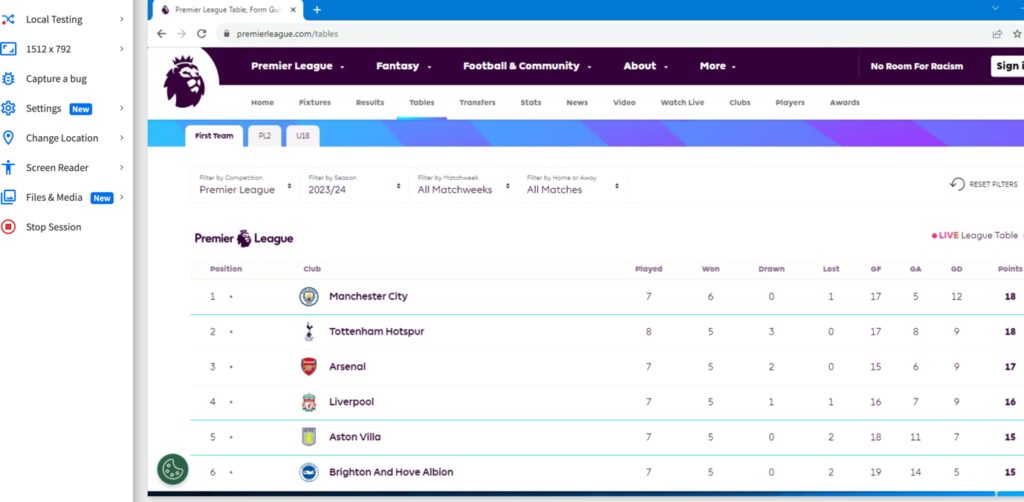
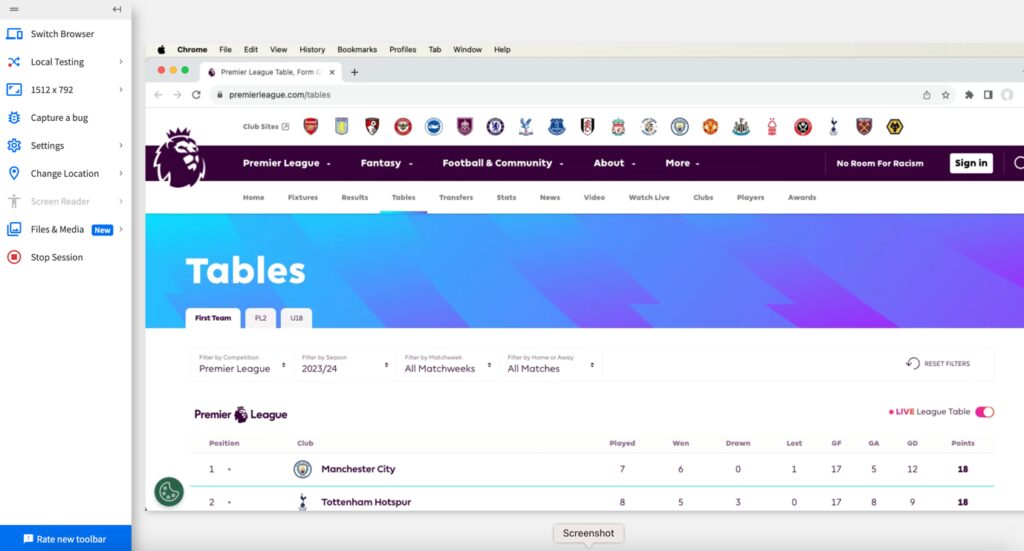
After you pick the OS and browser combination, BrowserStack will dedicate a live device for you and spin up the browser you selected. You can then navigate to different URLs and begin your testing.
Windows:
MacOS:
Android:
iOS:
4. Debug and Optimize:
BrowserStack Live has powerful embedded debugging tools to identify and debug issues instantly. Using these tools you can reproduce bugs, test different scenarios, and optimize your application’s performance and user experience.
You can use the live browser’s developer tools to view console logs or network requests.
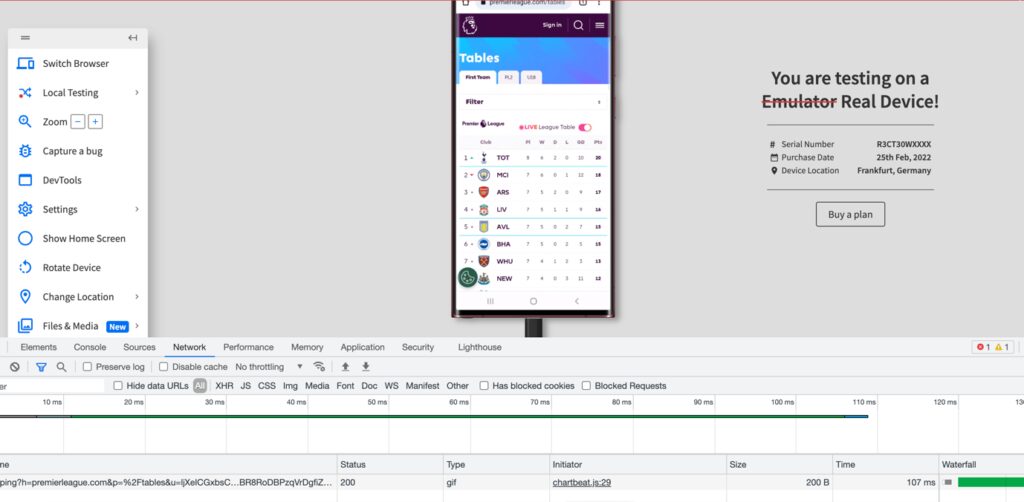
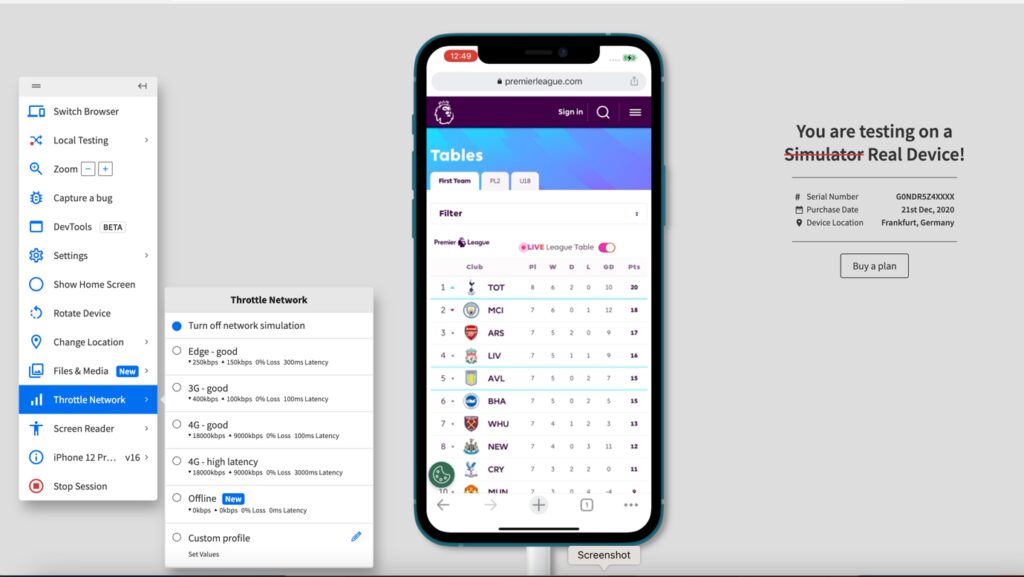
You can also throttle network requests to see how your web app behaves on different network speeds.
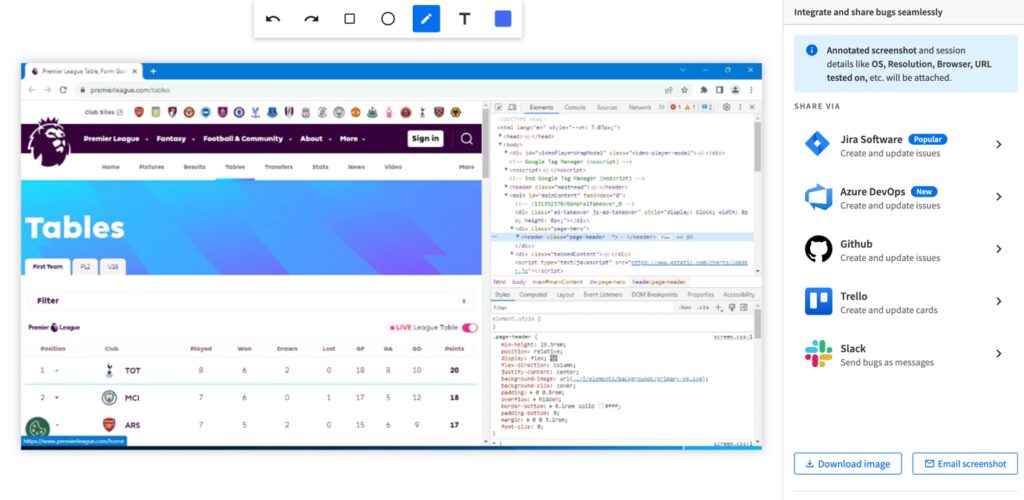
When you find a bug, you can share the details of it with your team along with custom annotations and session details, including OS, resolution, browser, tested URL, and more as attachments via different apps like Jira, GitHub, Slack, etc.
5. Collaborate and Share Results:
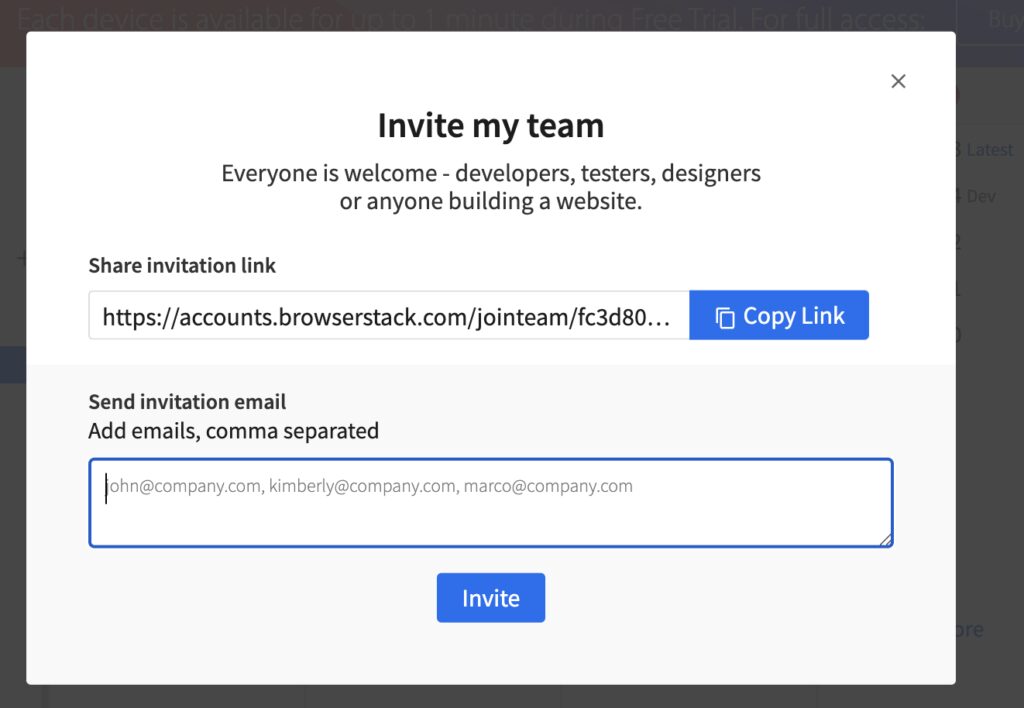
Collaborate seamlessly with your team by sharing live test sessions. BrowserStack Live also allows you to share test results and sessions with stakeholders, ensuring transparency and efficient communication. You can do this by inviting team members to your test sessions.
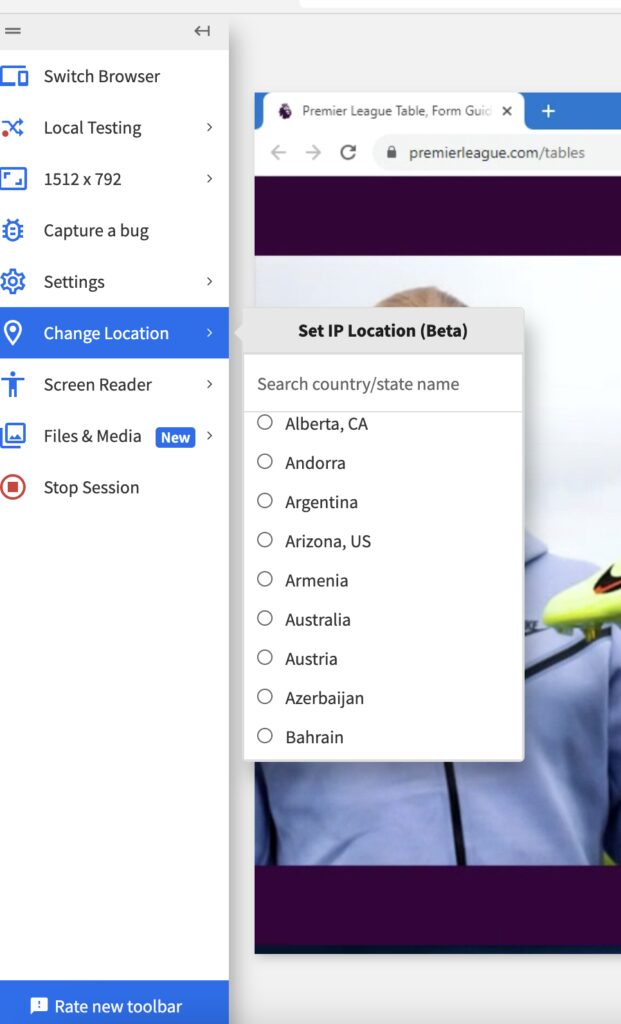
6. Geo Location tagging:
BrowserStack Live ensures global compatibility. You might have a pricing page on your app that shows different pricing in different currencies for different regions. How do you test that efficiently? Using a VPN? Well, you do not need one when you have Live. You can simulate geolocations and test your app in various regions.
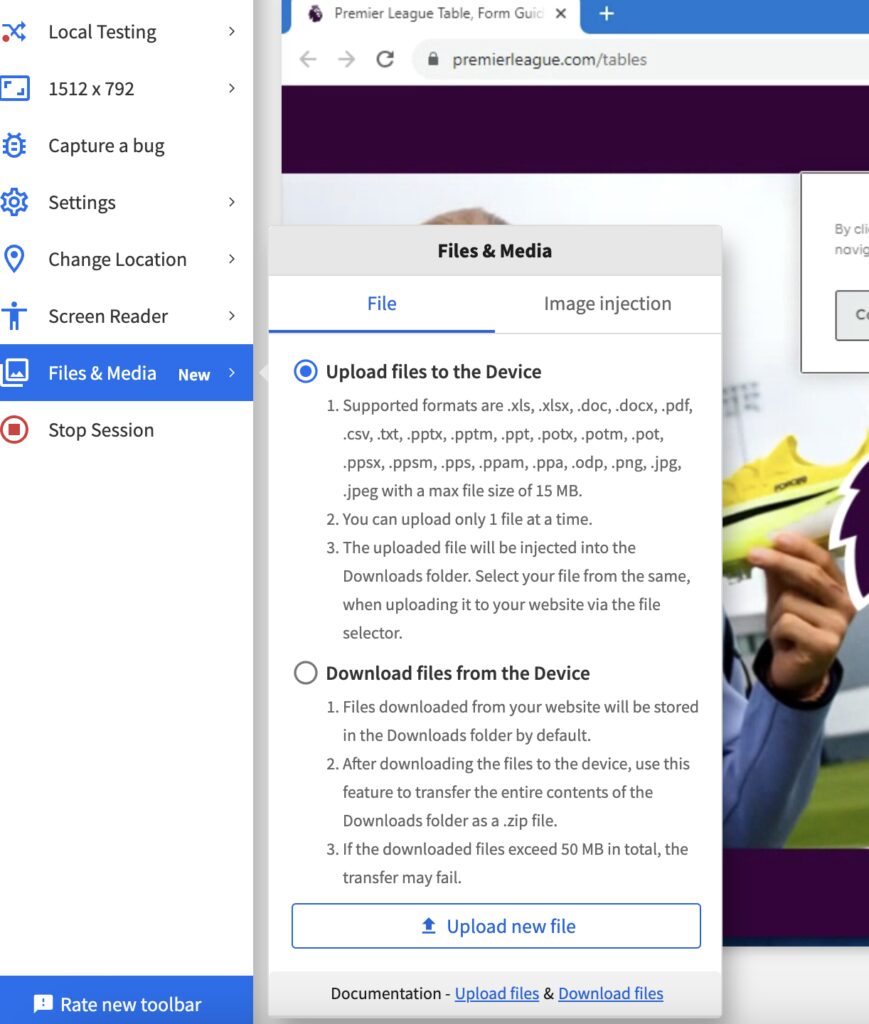
7. Upload/Download files to/from live devices:
You can seamlessly transfer your files to and from live devices with BrowserStack Live’s file upload feature. This allows testers and developers to directly transfer and utilize their local assets, such as files, scripts, or test data, on real devices in the testing environment. This feature streamlines the testing process by enabling users to work with their preferred resources without the need for additional setup or manual transfers. It promotes efficiency, accuracy, and the ability to conduct comprehensive testing with ease.
Conclusion
BrowserStack Live is a game-changer in the world of real-time, interactive testing. With its extensive browser and device coverage, instant bug reproduction, and seamless collaboration features, it empowers development and QA teams to ensure the highest quality and user experience for their web applications. Embrace the power of BrowserStack Live to bring your testing efforts to the next level, delivering reliable and optimized web applications in today’s competitive digital landscape.
BrowserStack Live vs Automate: How to Choose
Deciding between BrowserStack Live and Automate depends on your testing needs. Live is ideal for interactive testing and quick checks, while Automate excels at automated regression testing and continuous integration.
Think of BrowserStack Live as your on-demand virtual testing lab. You get instant access to real browsers and devices, letting you manually test your website or web app across different environments. It's perfect for exploratory testing, usability checks, or verifying quick fixes. If you need to reproduce a bug a user reported on a specific browser version, BrowserStack Live is your go-to tool. You can even test on real mobile devices, mimicking real-world user conditions.
BrowserStack Automate, on the other hand, focuses on automation and efficiency. It's designed for running large-scale automated tests, making it a key component of continuous integration and continuous delivery (CI/CD) workflows. With Automate, you can run thousands of tests simultaneously across various browser and OS combinations, dramatically reducing testing time. This is especially useful for regression testing, ensuring that new code changes haven't introduced bugs into existing functionality. If you're looking to scale your testing efforts and accelerate your development cycles, Automate is the better choice. For a deeper dive into test automation, check out MuukTest's test automation services.
In short, if you need quick, manual testing across different browsers and devices, choose BrowserStack Live. If you need to automate your testing process and integrate it with your CI/CD pipeline, choose BrowserStack Automate. Many teams find value in using both tools together, leveraging Live for ad-hoc testing and Automate for comprehensive, automated testing.
Frequently Asked Questions
Can I use BrowserStack Automate and BrowserStack Live together?
Yes! Many teams benefit from using both tools. BrowserStack Live is ideal for interactive, manual testing, while Automate excels at large-scale automated testing, making them complementary for comprehensive test coverage.
How does BrowserStack Automate handle testing on different mobile devices?
BrowserStack Automate provides access to a wide range of real iOS and Android devices. You can specify the desired device and OS combination in your test configuration, and Automate will run your tests on those specific devices in the cloud. This eliminates the need for maintaining your own mobile device lab.
What are the key differences between BrowserStack Automate and BrowserStack Live in terms of testing approach?
BrowserStack Automate is designed for automated testing, allowing you to write scripts that execute tests without manual intervention. BrowserStack Live, on the other hand, is for interactive, manual testing. You directly interact with the web application on different browsers and devices through BrowserStack's platform.
How does BrowserStack Live help with troubleshooting browser-specific issues?
BrowserStack Live gives you instant access to a variety of different browsers and browser versions, allowing you to easily reproduce and investigate browser-specific problems. You can use the built-in developer tools within the live browser session to debug issues and verify fixes. This makes it much easier to identify and resolve compatibility problems across different browsers.